Sometimes, you just hit a wall.
It’s been exactly two months since we bought our big blue bus, and almost as many weeks that we’ve been working ten hour days, seven days a week.
At some point, the body and mind just give up. Since our last bus conversion update, we’ve tackled some pretty monumental tasks in the bus. We’ve installed the water heater, built the dining room seats/storage benches, installed our new [amazing] fridge (which involved an unfortunate incident with UPS), and finished the bed frame. That was the “easy” stuff.
.jpg)
Yes, this is Bruno, but more importantly, this is the water heater he installed.
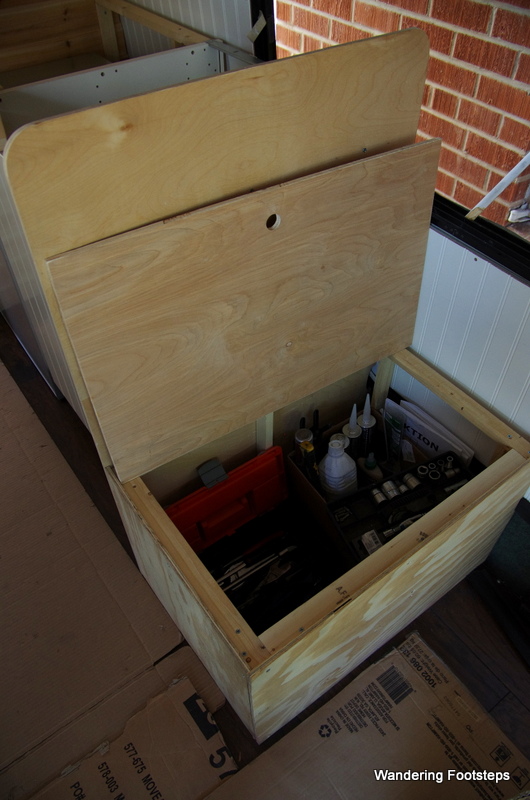
One of the dining room seats/storage benches we built. Bruno is already making use of the storage space!
.jpg)
Our new Indel Webasto fridge. I cannot wait to fill it with yummy food!

Our bed frame is done! We have the water tank and lots of storage space underneath. Simple, but very useful, and a copycat design from our Toyota camper van.
The difficult stuff involved plumbing, which I have gathered is not Bruno’s favourite task. (He actually enjoyed doing our solar insulation). Our plumbing set up is complicated enough to send seven Home Depot employees off scratching their heads, because it involves connecting parts that have different diameters and using a combination of flexible tubing and PVC piping.
Essentially, one-inch flexible tubing comes out of our water tank and needs to head off into our water heater and our faucet. Both those items are standard household items, whereas the water tank is an RV item, so they need adapters to fit. Then, from the sink, we need water to drain down under the chassis and to the other side of the vehicle to the grey water tank (not yet installed). At the same time, the shower water needs to drain into the same tank (which is at exactly the same height as the shower itself, but that’s a problem for another time). Only the tubing size for the sink and the shower are different and I couldn’t find any tees that adapted to two different diameters of tubing as well as different materials that would also fit into an RV grey water tank.
Cutting a hole into the chassis for the shower evacuation. The first plumbing-related task Bruno attempted. He quickly moved on to solar pannels and electricity!
Bruno working on the plumbing that would bring water to the water heater and shower.
The plumbing connections after the water tank – our water pump and a few tubes headed to the sink and shower. All hidden under the bed or floor.
PVC pipes from the sink down under the chassis. Bruno had to install them this way because the AC unit was directly under the sink. These are the complications when you’re installing plumbing onto a bus rather than a house.
Since the get-go, I have been in charge of visits to hardware stores to buy the building materials Bruno requests for the day’s project. I’ve always been the type of person whose eyes glaze over the moment they enter Home Depot, so this hasn’t been a natural role for me to fill. Despite lifelong efforts not to learn anything about DIY construction, my daily visits to all the hardware stores of Tucson have filled me with vast amounts of useful (but highly undesirable) knowledge.
A lot of this knowledge has come because Bruno has pushed me to my own edge and beyond. He often sends me to the store with only an explanation of what he’s trying to do and asks me to find a workable solution. Other times he sends me with an exact idea of a part he wants, but when I get there, there are fifty varieties of that part but none exactly like his description. I often end up having to improvise, using my limited knowledge and trying to explain my needs to employees with drawings and hands (since the only vocabulary I have for the parts I need is Bruno-ified French terms). I often curse the fact that we only have a single phone between the two of us.
The chicken-scratch designs I’d often head to the hardware store to help me understand what I was trying to buy/solve.
“Could THIS work for our plumbing problem?” I have so many pics quickly shot with my phone which I bring home to Bruno to discuss before returning to the store and buying what we’ve decided on. I’ve recently just started buying all the possibilities and returning the ones I don’t need later.
Our crazy workshop, where I stockpile all the stuff I keep having to pick up at the hardware store.
On the day Bruno sent me to the store to buy all the adapters and tees needed to solve our plumbing issue, I thought I understood our problem. Once I got to Home Depot and stared at vast array of hardware in front of me, I realized I truly had no clue how to troubleshoot our plumbing issue. Long story short, three hours went by, I could be found sitting in the plumbing aisle with tears streaming down my face, and four able plumbing “experts” couldn’t help me (part of that is I didn’t really know what I was looking for). I left the store without a single plumbing piece.
I had hit my wall.
Bruno’s had come a few days earlier. I’d noticed him getting more and more exhausted over the previous couple weeks. His face was showing fatigue, his mood became more and more ornery, and he’d often stop speaking mid-sentence because he simply didn’t have the energy to continue. To top it off, it had gotten hot in Tucson. Like, 37 degrees celcius inside the bus by 11am hot. It was as though someone up in the sky had suddenly turned the oven on. The heat in the bus made afternoon work even more exhausting than it already was.
One afternoon, after Bruno had been exhibiting scary signs of fatigue, it clicked for me. Bruno was putting enormous pressure on himself to build me a beautiful bus. He knew how much I wanted (needed, even) this bus, and he also knew that my expectations and hopes for the final product were very (read: unreasonably) high. And so, out of love for me, Bruno had put the weight of our world on his shoulders. Slowly, the weight became so much – the project so big, so complicated, so beyond his experience – that he cracked.
Inside the bus. Yes.
Bruno isn’t trying to be sexy – the bus is a sauna these days.
Bruno powering through, despite incredible fatigue and stress.
Bruno hit his wall, and it was heartbreaking to see.
Hitting one’s wall must be contagious, because, as I mentioned in my last post, our HelpX volunteer Ryan hit his own wall the day after Bruno. The only difference is that when Ryan hit it, he was able to resign from his position, book a train ticket, and head back to San Diego.
Somehow – thankfully – hitting our personal walls, and losing Ryan, has brought Bruno and me together. The pressure that we’d built up around this project burst and subsequently dissipated. We reframed our timeline for finishing the project, I restated more reasonable expectations and reassured Bruno of my amazement at his work so far, and he began coming to Home Depot with me. The heat has forced us to take frequent air-con breaks inside, and our evening dinners for two have been an opportunity to reconnect.
In short, we feel so much better.
Our bus conversion project is still crazy challenging. Installing the shower is a perfect example of how a single piece of our future home can involve so many difficult steps. To get our shower to where it is now (about 90% done), we had to build a faux floor over the wheels, find a shower base that was just the right dimensions (not easy!) and fit it onto the floor. Then we had to cut a hole in the chassis under the drain (making sure, of course, that the drain didn’t fall on the wrong place in the chassis – which it almost did) and fit PVC piping underneath (which involved elbows and adapters and two types of tubing). Meanwhile, we had to build the shower wall frames, install the water heater on the wall, and connect it with the water tank (which involved running tubing under the bed frame and inside the shower wall frames). We had to install a little faucet to run between the heater and the shower head (to prevent leaks), close up the wall with plywood, measure FRP plastic board (a CRAZY hard task because of our crooked walls), glue them onto the plywood, and build mini side walls (which will help prevent water from leaking out the sides of our shower curtain), which also needed plywood, FRP, and cedar planking.
The shower base, wall frames, and piping.
Gluing the FRP onto the shower walls. We couldn’t take photos WHILE gluing for obvious reasons. 🙂
Ahh… the hard part is over! The FRP walls are up. Now we just need to silicone the angles and [hopefully] our shower will be waterproof.
The mini-walls which will help keep the water inside the shower curtain.
Phew! I don’t even know how many hours all that took and we’re not even done! We still need to figure out how to connect the shower head to the water heater without compromising the waterproof nature of our shower, but that’s a problem for another day.
Despite the challenges, we’re seeing progress. After researching DIY compost toilets and purchasing a Separett Privy 500 toilet seat (which separates liquids and solids to drastically reduce odour), I found a design that appealed to me and would work in our tiny space. Bruno and Ryan built the toilet box, I bought the bucket for the solids (along with biodegradable bags and coconut coir for compost material) and the pipes and tubes necessary to evacuate the liquids, and Bruno installed the tubing, adjusted the Separett seat, cut an evacuation hole in the chassis, and voilà, we have ourselves a functioning toilet!
Now we just need to build a door.
The beginnings of our composting toilet – a box, a seat, and a bucket.
The toilet seat cutout (and my constipated look, haha!)
Toilet seat installed, box almost complete.
The piping for the evacuation of “the liquids”.
Now we just need a door!
I’m also feeling useful in a different way than before. Now that Ryan is gone and most of the necessary purchases are made (thankfully, as we’ve reached our project budget – oops!), I have become Bruno’s assistant inside the bus. I measured and cut the FRB board for the shower and helped him glue and install it. I sanded and sealed the butcher’s block for our kitchen. I have even begun cutting and nailing cedar planks to the mini-walls for our shower (which involves a power tool, people!)
Look at me go! I’m cutting cardboard to get the shape of the shower walls which I will then trace onto the FRP board.
I sanded and sealed our new butcher’s block. Isn’t it gorgeous? I cannot wait to food prep on it! (By the way, I used an eco-friendly sealer which uses natural oils and beeswax. It was easy to use, didn’t smell, and is food safe. Now we just need to see how well it holds up!)
Installing cedar planking on our shower mini-walls.
This involved learning to use a power tool! First time, yo!
Most importantly – more than seeing progress or feeling useful – Bruno and I have reached a comfortable, less stressful place in our interactions with each other and this F%@#ing bus! It may not last, but four days of relative peace and calm – and even a bit of laughter! – has done us both a world of good.
The challenges will always be there, what’s important is to adjust one’s attitude toward them.


Leslie Brown - sooner or later, we all hit the wall, it starts to get better soon after that..
Love, Grampa
Brittany - Wise words from a wise man. You’re totally right, and that’s exactly what happened. 🙂
Molly McCarron - It looks awesome so far guys! I do hope you come back to L.A. because I want to see it. Bruno is so crafty! You are so lucky-my husband is the exact opposite!
Brittany - Molly!! I must have conjured you up because I thought of you this week and wondered how your own renos were going!! Finished? (No thanks to your hubby, I guess, haha!) Thanks for saying hi!
P.S. I seriously plan to get around to some blog design changes you suggested, but it’ll have to wait until after this conversion thingy!
Molly McCarron - They are still going on Brittany. It’s nearly done. We had a contractor take our money and walk off the job. He put a hole in our roof and didn’t cover it during our heavy rains. Yay! We have someone else finishing it though. Thank god you have Bruno-You are blessed!
ESears - So happy to see how much you’ve accomplished so far. It’s great that you are learning these new skills, Brittany. Bruno’s work is so impressive!
Brittany - I didn’t know he was capable of such polished work! He’s a pretty impressive catch, no?